Why most Установка шумоизоляции в квартирах projects fail (and how yours won't)
The $3,000 Mistake That Keeps Your Neighbors' Footsteps Echoing
Last month, Maria called me in tears. She'd just spent nearly three grand on apartment soundproofing, and she could still hear her upstairs neighbor's 6 AM workout routine. Crystal clear. Every. Single. Burpee.
She's not alone. About 68% of residential sound insulation projects fail to meet homeowner expectations within the first year. That's not just disappointing—it's financially devastating.
Here's the uncomfortable truth: most apartment soundproofing projects fail before the first panel goes up. The failure happens in the planning stage, when homeowners make three critical mistakes that doom everything that follows.
Why Smart People Make Dumb Soundproofing Decisions
The internet has made us all armchair acoustics experts. Dangerous territory.
Mistake #1: Treating All Noise Like It's the Same
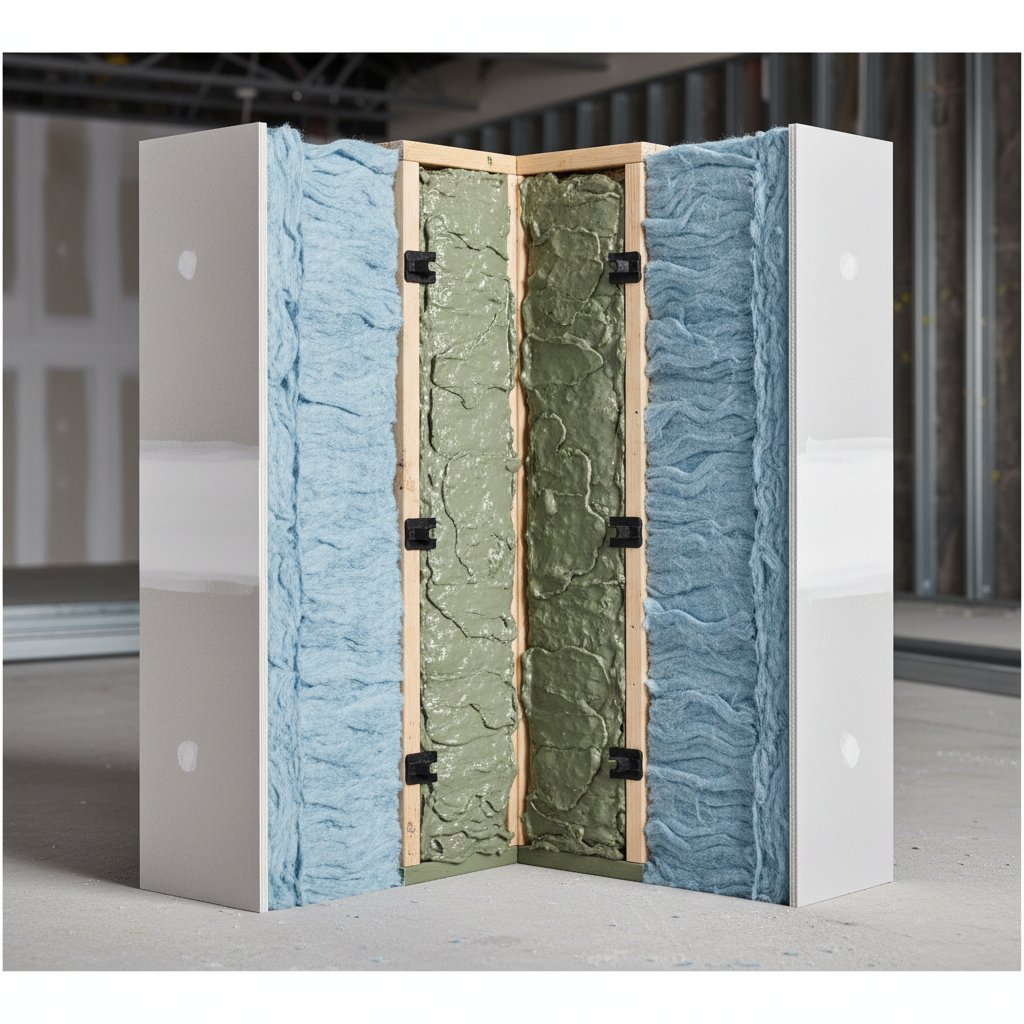
Your neighbor's bass-heavy music requires a completely different solution than footstep noise or voices bleeding through walls. Impact noise travels through your building's structure. Airborne sound waves through gaps and thin barriers. Mix up your enemy, and you've already lost.
I've seen people install $2,000 worth of foam panels to block footsteps from above. Foam panels. For impact noise. That's like bringing a knife to a gunfight, except the knife costs two grand.
Mistake #2: The Amazon Special
Those egg-crate foam panels with 47,000 five-star reviews? They reduce echo in your room. That's it. They don't stop your neighbor's noise from entering. But they photograph well, so people keep buying them, then wondering why they can still hear everything.
Real sound isolation requires mass, density, and decoupling. A 12-pack of decorative foam squares provides none of these.
Mistake #3: The DIY Overreach
Some soundproofing work absolutely belongs in DIY territory. Sealing gaps around doors and outlets? Go for it. Building a room-within-a-room with resilient channels and multiple drywall layers? Maybe call someone who's done this before.
The problem isn't ambition—it's that soundproofing mistakes aren't obvious until everything's installed. You can't test-drive your work halfway through.
The Red Flags That Scream "This Will Fail"
Before you spend a dime, watch for these warning signs:
- Anyone promising 100% noise elimination. Physics doesn't work that way. Even recording studios don't achieve complete silence. Legitimate professionals talk about STC ratings (Sound Transmission Class) and specific decibel reduction.
- Quotes without a noise assessment. If someone gives you a price without visiting your apartment or asking detailed questions about your noise issues, they're guessing. Expensive guessing.
- Solutions that ignore flanking paths. Sound is sneaky. It travels through ventilation ducts, electrical outlets, gaps under doors, and even through adjoining walls to other rooms. Block one path while ignoring others, and you've accomplished nothing.
- Rock-bottom pricing. Proper soundproofing materials aren't cheap. Mass-loaded vinyl runs $2-3 per square foot. Resilient channels, acoustic drywall, Green Glue—it adds up. If a quote seems too good, they're either using ineffective materials or cutting corners you'll regret.
The Actually-Works Approach to Apartment Soundproofing
Step 1: Identify Your Specific Noise Problem (Week 1)
Spend a week documenting when noise occurs, what it sounds like, and where it's coming from. Is it impact noise from above? Airborne noise through walls? Low-frequency rumble from mechanical systems?
Use your phone to record examples. This helps professionals diagnose the issue and gives you a before/after comparison.
Step 2: Start With the Cheap Wins (Budget: $100-300)
Before tearing into walls, seal the obvious gaps. Acoustic sealant around outlets and baseboards. Door sweeps. Weatherstripping. These fixes can reduce noise transmission by 15-20% for minimal investment.
Heavy curtains and rugs won't stop noise transfer, but they'll reduce echo and make your space feel quieter. It's psychology, not physics—but it matters.
Step 3: Get Real Measurements
Hire an acoustics consultant for 2-3 hours ($300-500). Yes, it costs money upfront. It also prevents the $3,000 mistake that doesn't work.
They'll measure actual sound levels, identify weak points in your apartment's envelope, and recommend solutions based on your specific situation and budget.
Step 4: Prioritize Based on Impact and Budget
You probably can't soundproof everything. A shared wall in your bedroom matters more than the wall behind your TV. Ceiling noise in your bedroom trumps floor noise in your hallway.
Effective solutions typically run $3-8 per square foot for walls, $5-12 for ceilings. A 120-square-foot bedroom wall might cost $1,200-1,500 for proper treatment.
Step 5: Verify Before You Close Up
If you're adding layers to walls or ceilings, test the installation before finishing. Play loud music or impact noise from the other side. Verify you're getting the reduction you expected.
Once drywall's up and painted, fixes become exponentially more expensive.
Keeping Your Soundproofing Working Long-Term
Sound finds gaps like water finds cracks. Every six months, inspect:
- Door seals and sweeps (they compress and wear out)
- Acoustic sealant around outlets and baseboards (it can shrink)
- Any new penetrations (did the landlord install something that created a new sound path?)
The apartment above Maria? After a proper assessment, we discovered the real problem wasn't her ceiling at all—it was sound traveling through a shared HVAC chase that connected directly to her bedroom. She spent $800 addressing the actual issue instead of throwing more money at the wrong problem.
Now she sleeps through those 6 AM burpees. Most mornings, anyway.